Lime Plastering: Part 1
AD. This post contains Affiliate Links, which means that if you choose to buy a product via a link in this post, we will receive a small commission from the purchase.
For the past few months, I think about 70% of the renovation work Will and I have been doing on the Cottage have been related to Lime Plastering. Most of you reading this will have knowledge of plaster to some degree - you will either have some form of plaster in your homes, you will have seen a plasterer at work, or perhaps you’ve even tried some patch plastering or skimming yourselves. However, I think the likelihood is that whilst many of you will have experienced gypsum plaster, only a few will have had much to do with the mysterious lime plaster.
Lime, and lime plastering in particular, is a material that we have had to wrap our heads around quite quickly since moving into the Farm last April, in order to ensure we have been making the best decisions for our property. As many of you already know, we had originally thought we could get away with just cosmetic work on the Farm, but soon found ourselves stripping the Cottage, the first of the buildings we’re renovating here, of its cement and gypsum plasters, going right back to the stone and effectively starting again. Since sharing our journey with lime on our Instagram page, I have had no end of questions ranging from why we are using lime, to what it is, where to buy it, and how to use it.
The truth of the matter is that whilst lime is not a new material, and in fact has been used for thousands of years, it can be tricky to find easy to understand, jargon-free information on how to use it that is accessible and easy to understand for the likes of you and me. Neither Will or I had ever touched a plasterers hawk before starting to renovate properties, and neither of us had even considered plastering a full wall, let alone an entire house, before we started work on the Cottage 9 months ago. We don’t have any training, other than what we have learnt through our own research, the brilliant free online sessions run by Cornish Lime (sign up for those here), and a decent chunk of trial and error. Overall, I’m probably just about the least qualified person to be even broaching this topic, and so please be sure to do your own research alongside using the following post as a guide, and remember there are people far better equipped than me to teach you about Lime. The below is just a summary of what we have found works for us, and whilst I hope it will help you too, it is important to note that as with all things construction and renovation based, one size definitely does not fit all, and it may take some trial and error (and even some expert help) to find a solution that is right for your home.
If you’re new to Lime altogether, I’d recommend having a read of my earlier blog post, Dealing with Damp, which explains breathable materials in a little more detail before reading on.
Lime vs Gypsum
So, on we go. Before we start digging into the nuances of lime, it’s important to define what we’re talking about. There are two main materials that are used for plastering, lime and gypsum. Both lime and gypsum are naturally occurring materials which have been used in the UK, and throughout the world, for hundreds of years. Lime plaster, mortar and paints have been used for thousands of years, and ancient lime plasters have been found in the preserved ruins of Pompeii, Italy, whilst Gypsum was used in Ancient Egypt in Pyramids. However, whilst they are both historically used, naturally occurring materials, they have extremely different chemical compositions and properties which make them suitable to very different applications.
Lime (a form of Calcium Carbonate) is made from a process of burning limestone to form quick lime (Calcium Oxide), and then slaking the quick lime with water in a dramatic chemical reaction (watch the video from about 1:20 to see this) to form Slaked Lime (Calcium Hydroxide). The Slaked Lime (aka Hydrated Lime) is matured in pits for a minimum of 3 months, which gives the lime better adhesive qualities, helping it to bond to the wall more better. Slaked Lime can be combined with sand and water in varying ratios to create lime mortars. Lime mortars set slowly through a process called Carbonisation, in which the lime in a plaster or mortar absorbs Carbon Dioxide from the air to form CaCO3 crystals, akin to limestone. As Lime dries, it shrinks slightly. Lime plaster is a breathable material, meaning it encourages moisture to ingress and egress through solid walls, helping to alleviate and prevent damp problems.
Gypsum, also known as Plaster of Paris, is a naturally occurring soft sulphate mineral, a crystal of Calcium Sulphate. In the UK, the most commonly quarried form of Gypsum is Alabaster, which is heated and ground into a powder. When mixed with water, pure Gypsum can set in as little as 10 minutes, and so modern bagged gypsum plasters, such as the type you might buy in a hardware store, also contain fillers and retardants to slow down the setting process. Powdered Gypsum plaster is mixed with water, and reacts to re-crystallise and form a set as it dries. A modern gypsum in a skim coat will set within hours of application, and expands slightly as it dries. The molecular structure of gypsum means that it is significantly less breathable than Lime, and so if used inappropriately in historic properties can cause aggravate damp problems.
“A breathable structure is one that allows the passage of moisture in order to prevent the accumulation of harmful water within the building fabric or its surroundings.”
Breathability in period properties, defined above by the Alliance for Sustainable Building Products (ASBP), is incredibly important, as it naturally manages the moisture levels in a structure in order to prevent damage. When this breathability is impaired through the introduction of non-breathable materials, damage to the fabric of a building is almost always inevitable. Modern alterations or repairs made to property, such as replacing original lime plaster with gypsum plaster or cement render, can stop this process of breathing from working correctly, leading to many of the problems heritage property owners now face - such as our 99.9 humidity reading in the Cottage, blown stone, damp spots and lots of mould.
Historically, gypsum plasters have been predominantly used in period properties for decorative plasterwork elements, such as cornice and ceiling roses, as gypsum plasters set so much faster than Lime. However, flat plasterwork, such as on the walls, was usually carried out in lime plaster. This is because Lime is a far more breathable material than Gypsum, which allows solid walled properties (such as the Farm, and most buildings built in the UK pre 1919) to naturally ingress and egress moisture through the walls, which helps to maintain a healthy internal environment and prevent damp issues (more on that in my Dealing with Damp and Lime Pointing blog posts). To be really clear, the ‘breathability’ of a material and the benefits of using breathable materials are not just conceptual, but is absolutely necessary to preserve historic properties. The use of inappropriate materials, such a gypsum on walls, can cause immense and irreparable damage to the structure of a building. In the past hundred years or so, there has been a huge decline in the use of lime plasters, in favour of using quicker setting gypsum plasters. This can partially be attributed to the tremendous loss of traditional skills as a result of WW1/WW2, but also speaks to the increased demand for ‘quick’ work to be carried out, often at a detriment to the health of a historic building. Whilst this has become common practise, and my intention with this post is not to demonise the use of gypsum plasters, it is incredibly important that we increase the awareness around lime as a structurally beneficial material, and try to reinstate or maintain it where possible to do so.

CLM 66 applied in the Cottage, before trowelling up.
“There is compelling evidence that modern gypsum plasters encourage condensation and consequent mould growth if used on walls that are supposed to ‘breathe’." - Tim Ratcliffe
Types of Lime
There are four key ingredients in any lime plaster; lime, an aggregate, pozzolanic agents, and water. Lime is perhaps the most befuddling of the four (I think we can all get our heads around the water part!) so let’s start there. There are three key types of lime you will encounter when renovating period buildings:
Non Hydraulic Lime: sets by carbonisation, a reaction with carbon dioxide.
Non Hydraulic Lime sets slowly, and is very breathable.
Lime Putty: a saturated form of Non Hydraulic Lime.
Also known as fat or white limes, lime putty is the purest form of Non Hydraulic Lime, and is generally used for plasterwork, lime wash, pointing masonry and render.
Natural Hydraulic Lime: sets by hydrolysis, a reaction with water
Natural Hydraulic limes are sometimes used for plastering in damp areas. They are stronger than Non Hydraulic Lime but are slightly less breathable and flexible than Lime Putty (but still far more breathable than Gypsum or Cement)
Confusingly, Non Hydraulic Lime and Natural Hydraulic Lime are both shortened to the acronym NHL. A simple way to work out if you are buying Non Hydraulic Lime or Natural Hydraulic Lime is to ascertain what form the lime will be delivered in. If it is wet, and delivered in plastic bags or buckets, it is likely to be Non Hydraulic Lime, as this will set with exposure to Carbon Dioxide. If the plaster is delivered in powder form (usually in 1 tonne builders bags or smaller paper sacks), the plaster is more likely to be Natural Hydraulic Lime, and will need to be mixed with water to form the plaster and begin to set.
To make buying your lime even more confusing, Lime is sold in different grades which relate to the compressive strength of the lime. These is more on this in my blog on Lime Pointing, but as a general rule for internal plastering you should be using NHL 2 or NHL 3.5, depending on the finish you are looking for. NHL 2 is a weaker lime than NHL 3.5, but depending on the aggregates (such as sand) it is combined with, can still provide a strong and durable plaster. At the Farm, we have used and continue to use both Non Hydraulic Lime and Natural Hydraulic Lime for different applications. Both have their strengths and weaknesses, and its important to consider factors such as how damp an area, ground level, and host masonry ahead of choosing which plaster is best for you.
To add one final level of confusion (sorry), manufacturers of lime will use the term mortar to refer to both plaster and mortar for pointing. This is because, really, plaster and mortar are the same thing, made from the same ingredients, just in different quantities. So if you’re looking to order a plaster and all you can see is options for mortar, don’t worry, you’re in the right place!
The harling coat, applied in the Cottage lounge
Pozzolanic Agents
Pozzolanic Agents, aka Pozzolans, sound way, way cooler than they actually are. Effectively, pozzolans are setting agents that are added to lime products to help aid the setting process. They tend to be made from volcanic ask or brick dust, and can encourage the plaster or mortat to set. There’s nothing fancy about them, and they’re not always used, but think of it like adding a little baking soda into a cake - it just helps all the other ingredients do their thing.
Aggregates
Aggregates refers to the material the lime will be combined with to form a mortar, and this is usually sand. As lime is graded (NHL 2.5/NHL 3/NHL5), the aggregate used can have a huge impact on the appearance, finish and performance of a lime mortar. For example, if you choose a coarse grade of sand, you will end up with a course plaster probably best used as a base coat, whereas using a fine sand will result in a finer plaster- better used as a top coat. The finer the sand, the smoother a finish you can achieve. Some almost gravel like aggregates are used in base coats of lime plaster to build strength into the wall, and hair is often added into the mix to give extra strength and flexibility to a plaster. Traditionally, horse hair would have been used but I’m pleased to report that modern synthetic (and significantly less smelly) alternatives are now readily available, so put your clippers away!
If you are repairing plaster in a historic property, it’s important to try to match the original materials used as closely as possible in order to achieve the same finish and allow the new material to work alongside the old, rather than damaging it further. If you are patching in plaster to repair existing limework, it may be worth paying for a mortar analysis which will help you discover what strength of lime, aggregates and pozzolans were used in your property.
Application
When working with lime in any form, do remember that lime is extremely alkaline and therefore can be caustic. It’s best practise to wear full PPE when mixing lime (ventilated area, mask, goggles, gloves) and we always wear gloves when working with lime. Trust me, I have had lime burns, and they hurt a lot!
Lime doesn’t set well in colder weathers. Whilst each manufacturer will have recommended working conditions for lime products, generally speaking it’s important to not carry out external work (such as rendering) in temperatures lower than 5 degrees Celsius. Internal plastering can be carried out year round, subject to interior temperatures being maintained above 5 degrees. Lime will dry quicker in warmer weather, and slower in colder weather, so maintaining a constant internal temperature whilst lime plaster cures will help it to carbonise and set properly.
The type and mix of lime that you will be using will vary depending on where you are plastering, the type of wall, whether it is internal or external, and whether or not you are looking for insulative properties from your lime plaster. We choose to buy our plasters premixed, as it saves us time and ensures we get the same finish in each room we work in. However, you can mix up your own mortars for plastering, and doing this is really very simple. I will go into more detail on this and on how to apply plaster in part 2 of this post, which I hope to publish next week, but for now let’s look at a quick overview of the plastering process.

A scratch coat of Insulating Render applied in the Cottage
Process
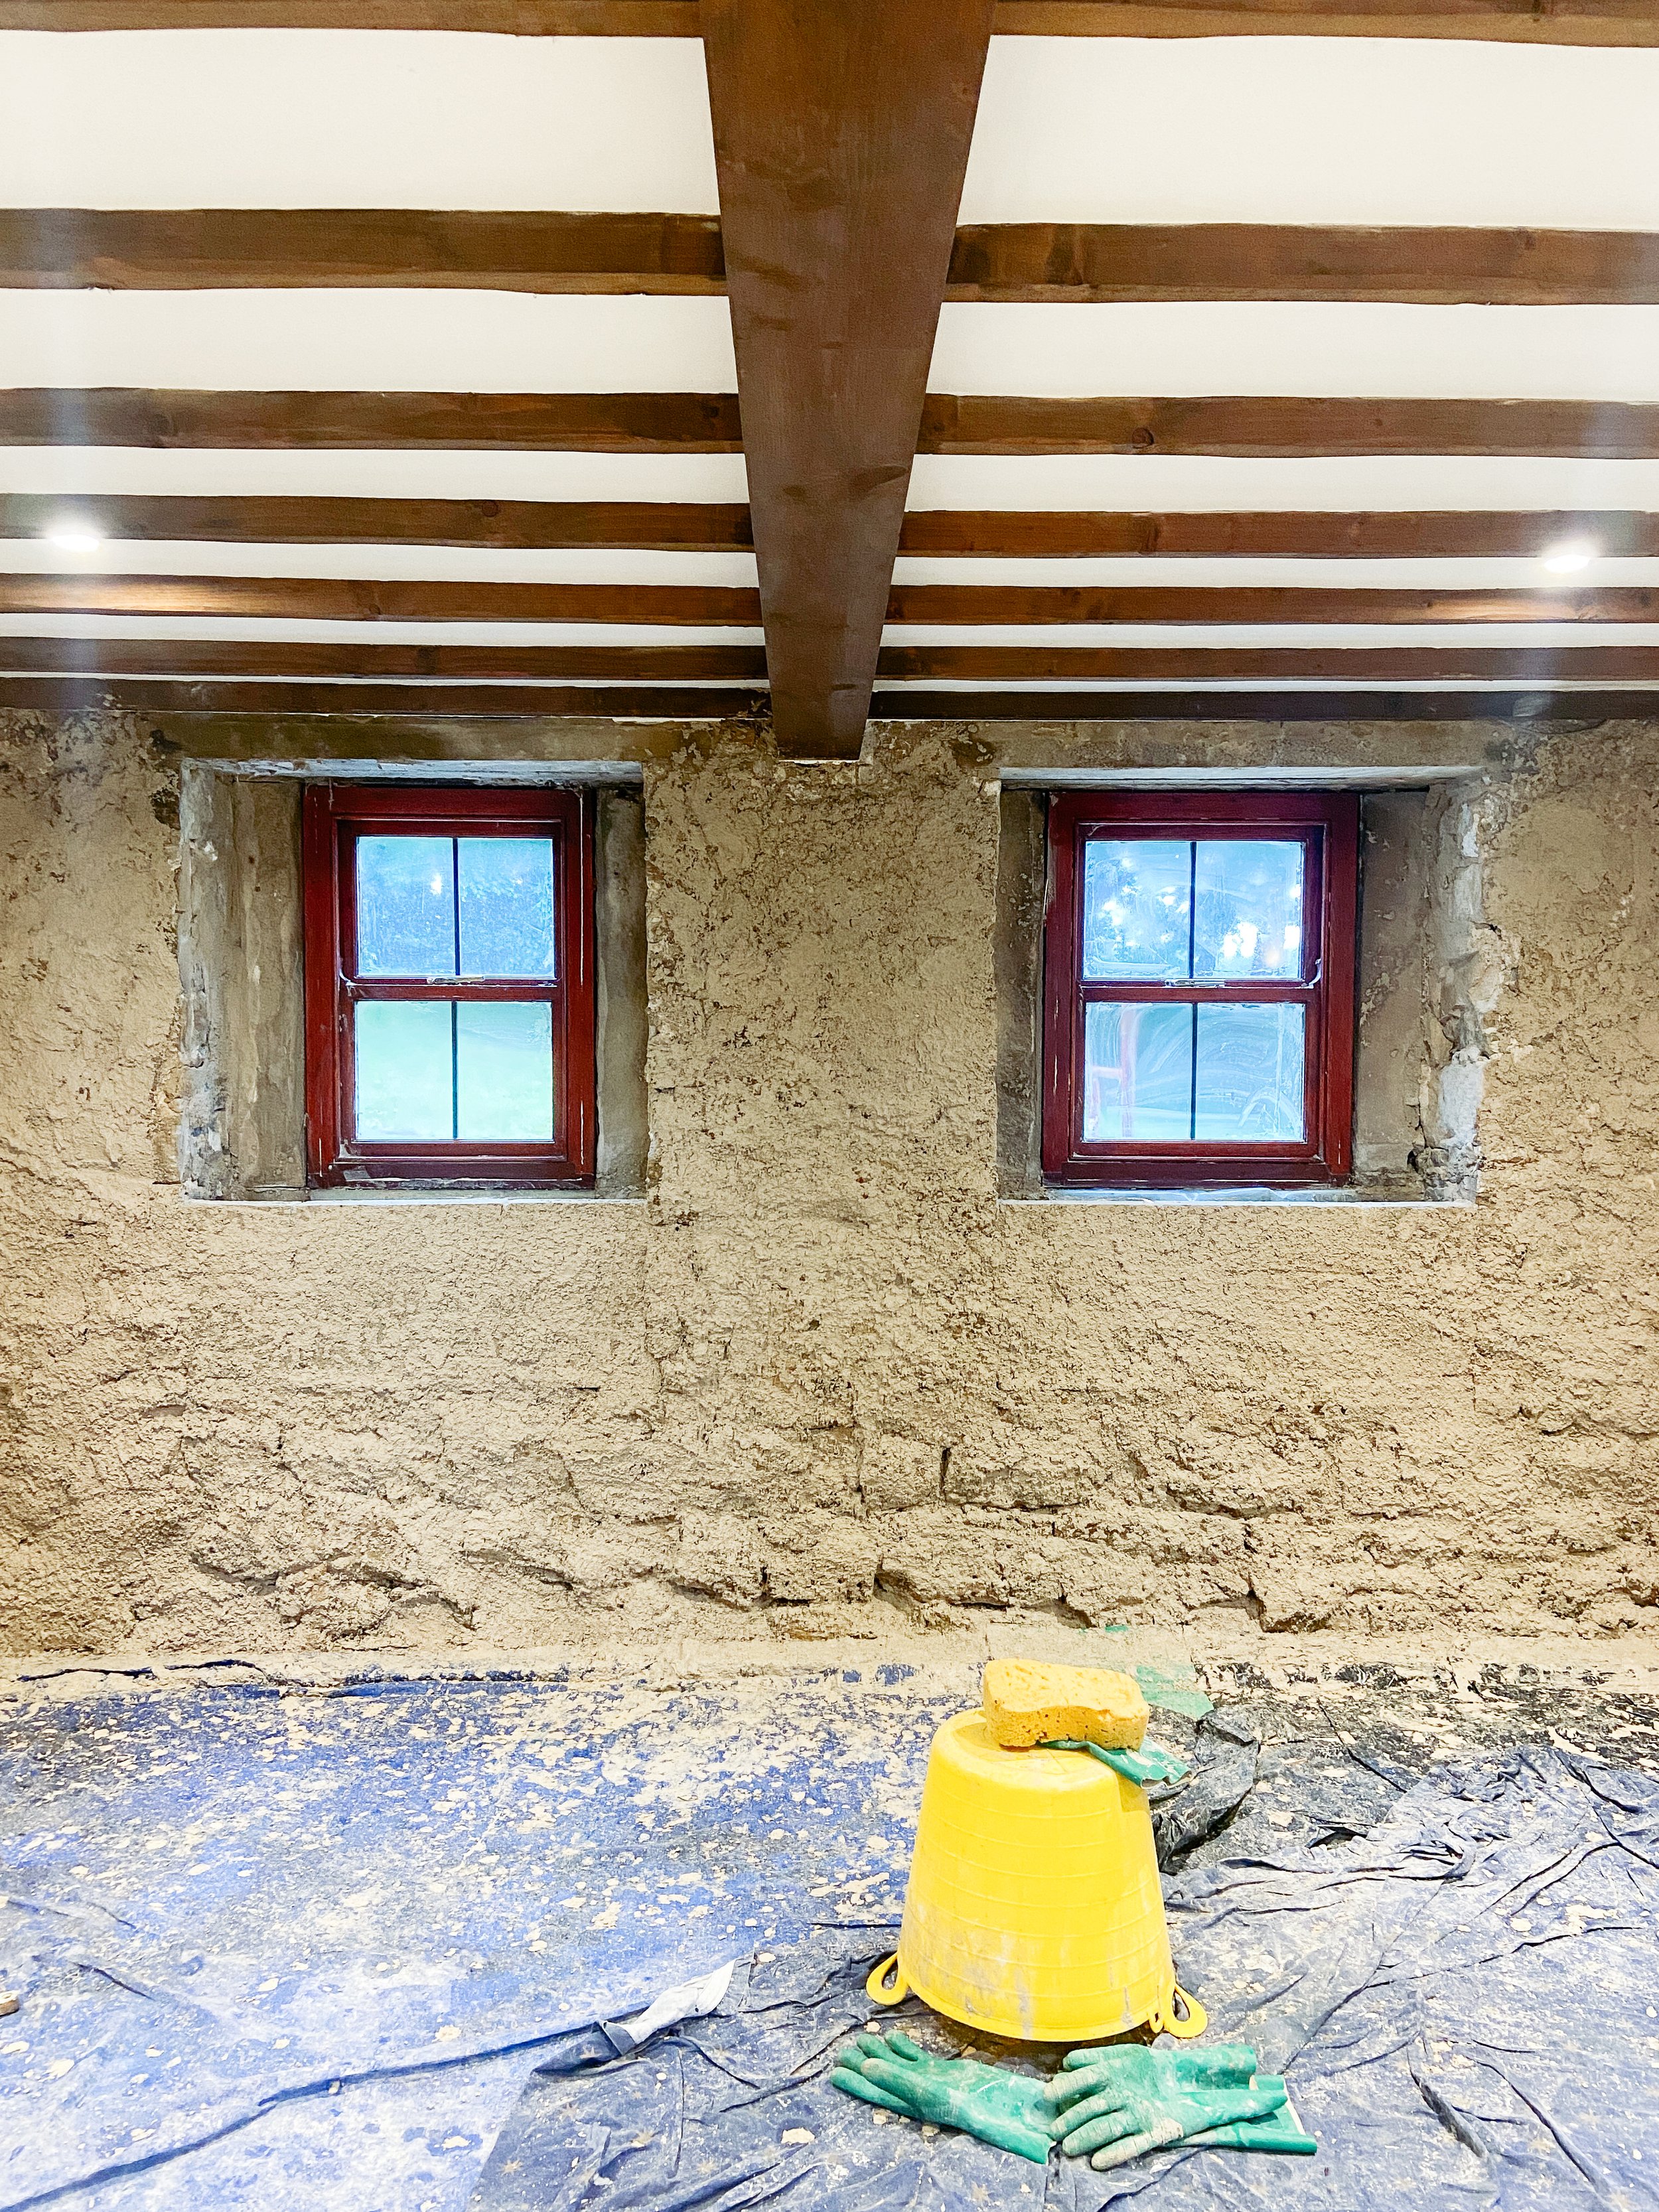
From the second half of the 17th century, Lime plaster has been applied in three coats which allows you to get a pretty flat finish (depending on how good your plastering is!). Agricultural buildings often only have two coats, or even one coat if a curvaceous finish was acceptable. How flat a finish you want will to a degree be personal preference; a Georgian manor for example might look slightly amis with undulating walls, whereas a rustic farmhouse can carry this look and in some settings it can actually accentuate the room and become a feature. Generally, I would suggest a minimum of three coats, and in some spaces we have actually applied four of five coats in order to achieve the finish we wanted.
When knocking up your plaster, be careful not to add too much water into the mix as it can result in shrinkage and cracking. It’s also important to make sure you thoroughly wet down the masonry of your wall , and between coats, ahead of applying fresh plaster. Wetting down between coats prevents too much suction between the coats, which can cause the fresh plaster to dry too quickly and fail. In order to be at its best, lime plaster needs to dry slowly over the course of a couple of weeks. With that said, the steps of lime plastering are:
Harling Coat: aka roughcast, bonding coat or harl
A Harling Coat can be applied as an initial stabilising coat to a wall that is a little unstable or loose, or built from porous materials such as cob. It may not always be needed, but is a good option if you feel your walls may benefit from some extra stability ahead of applying subsequent coats of plaster. Mortar used for harling should be wetter than standard plaster, and is applied very unceremoniously by literally throwing the mortar onto the wall using a flat trowel. For harl coats, we use Mike Wye’s SecilTek Reabilita Cal
Scratch Coat: usually 1:3 lime:sand, haired
The scratch coat is the first coat applied to the wall, and acts as a bonding coat. Whilst ideal ratios for plastering will vary from property to property, it’s generally accepted that a mix of 1:3 lime:sand is a good proportion for base coats. For scratch coats, I would also recommend adding hair into the mix if you are mixing yourself, which gives the scratch coat added strength and reinforcement. On internal walls, we use Cornish Lime’s CLM28 with Fibres, which is a ready mixed coarse mortar made using mature lime putty and premium CLS28 coarse (5mm down) washed yellow flint sand, with alkali resistant fibres. CLM28 can be applied in up to a 15mm coat.
On external walls, we use Cornish Lime’s Insulating Render, which as well as having all the breathability benefits of normal Lime Plaster, has additional thermal properties. Made from a combination of NHL 2 matured lime putty, recycled lightweight aggregates, and fibre additions to improve the flexural strength of the plaster. It can be applied in coats of up to 30mm in depth, allowing you to work much quicker than with standard lime plasters as fewer coats are required. Cornerstone Insulating Render has a measured K Value of 0.12, and a 25mm coat will improve the U Value of a solid wall by around 40%, whereas a 50mm coat will improve the U Value by around 60%. In the Cottage, we are applying two coats of 25mm (one scratch coat and once float coat).
The scratch coat is, I would say, the hardest to apply, and it’s important not to overwork it. As Cornish Lime put it, you should ‘lay it up and leave it’! Once applied, scratch coats are literally scratched using a scarifying tool to provide a key for subsequent coats. Sometimes, they are also churn brushed before scarifying to compact the plaster and provide more of a surface. If you are looking to apply more than three coats to achieve your finished plaster, you may apply more than one scratch coat.
Float Coat: 1:3 lime:sand
The float coat is applied at a similar depth to the scratch coat. This is your straightening coat, and your opportunity to level out any lumps and bumps or undulation in the wall, if you want to. There is less need for this to be a haired plaster, so on internal walls we use the unhaired CLM28 from Cornish Lime which is a ready mixed coarse mortar made using mature lime putty and premium (5mm down) washed yellow flint sand. It can be applied in up to a 15mm coat. On external walls, we use a second 25mm coat of the Cornish Lime Insulating Render, taking the total depth to 50mm. Rather than finishing with a scarifier, the float coat is finished using a plasterers float which compresses the plaster and opens up the surface to provide a light key for the skim coat.
Setting Coat: aka skim coat, 1:1 lime:sand
Skim coats, aka setting coats, are the finishing coat and the part of the plaster you see on a day-to-day basis. We use Cornish Lime’s CLM66 for skimming, which is a ready mixed fine plaster manufactured using Cornish Lime’s CLS36 sand and mature lime putty. It gives a superfine finish. If you are mixing your own skim, you can use ratios anywhere from lime rich (1:1 lime:sand) to lime poor (1:3 lime:sand) but you should use a fine sand such as silver sand. Top coats are more lime rich than scratch or float coats, so are more likely to shrink, so it’s best to leave the skim as long as you can before working the finished surface by trowelling up or sponging back (more info on finished to follow in part 2).
It’s difficult to give a definitive answer as to how long plaster should be left between coats, but do note that applying your coats too soon after eachother will result in uneven shrinkage, which will cause the plaster to crack under the pressure. The best approach is to keep checking the plaster, and if you’re not sure it’s dry enough for another coat, leave it a few more days. A trick I use is to press your fingernail into the plaster, and then your knuckle. The plaster is ready for it’s next coat when you can press in your fingernail, but pressing in your knuckle won’t leave a dent. In normal conditions it should be about a week between coats, but this can be affected by temperature, weather, and how much water was added to a mix.
I’ll be back here next week with part 2 of this post, which will cover the application process in more detail, and also talk about some of the plasters we use here and why we’ve chosen them (such as our experiences with hemp lime), so do pop back for that next weekend. I will also talk a little about paints, as you do need to use specialist paints on lime plasters. In the meantime, if you have any questions or anything you’d like me to cover in part 2, please pop it in the comments below and I will do my best to make sure it’s included!